
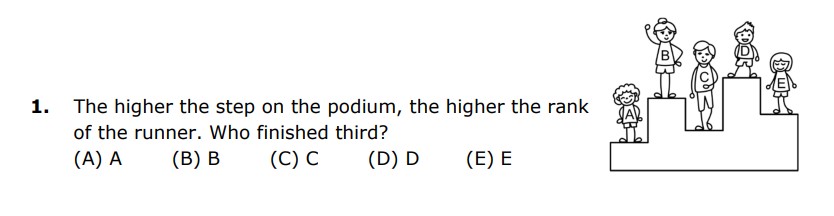
The problem asks you to figure out which runner finished third based on their positions on the podium. The podium works in such a way that the person on the highest step finishes first, the person on the second-highest step finishes second, and the person on the third step finishes third.
Now, looking closely at the podium, we see different runners labeled as A, B, C, D, and E, each standing on different levels. The runner who is standing on the third step is runner D. Since the third step determines the third-place finisher, we can conclude that D finished third.
So, the correct answer is D.
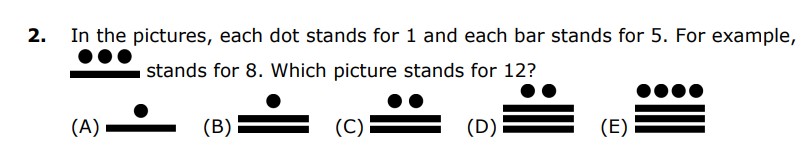
In this problem, you need to figure out which picture shows the number 16. Here’s how the pictures work:
Each dot represents 1 point.
Each bar represents 5 points.
To solve this, we should start by using bars because they are worth more.
First, let’s figure out how many bars we need to get close to 12. Lets start by dividing 12/5 so we know howmany bars we need.
12/5 is 2r2. So, this means we must have 2 bars, and 2 dots
So we have to find the answer choice that has 2bars and 2 dots since that represents the number 12.
Looking at the answer choices we see that C matches what we are looking for.
So, the correct answer is C.
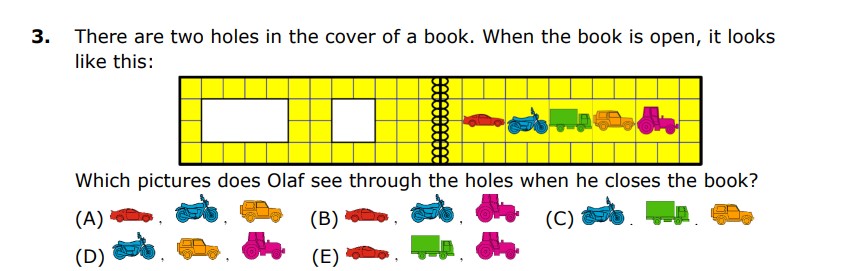
Let’s break this problem into steps
Open Book Layout:
The left side of the book has two square holes cut out.
The right side shows a series of vehicles in different colors: a red car, a blue motorcycle, a green truck, a yellow car, and a pink tractor.
Understanding the Holes:
The left page has two cut-out squares, which allow you to “see through” to whatever is on the right page when the book is closed. When the book closes, these holes will align with specific images on the right page.
Closing the Book:
You have to imagine the left page folding over the right page. As the book closes, the holes will cover some of the images on the right page.
Your task is to figure out which two images will be visible through these holes once the book is closed.
Identifying Alignment:
Based on the layout, the first hole on the left page will line up with the position of the blue motorcycle on the right page.
The second hole on the left page will align with the position of the yellow car on the right page.
Answer Choices:
The answer is Option D, as it shows the two images (a blue motorcycle and a yellow car) that will be visible through the holes when the book is closed.

Lets break this problem into steps!
Understanding Footprint Layers:
There are three distinct sets of footprints, each representing a different person.
The footprints overlap in certain areas, meaning some people stepped on top of others’ footprints.
The goal is to figure out who stepped first, second, and last based on the layering of the footprints.
Footprints on Top vs. Bottom:
First walker: The first person to walk across the field will leave footprints that are at the bottom, meaning none of their prints will be covered by anyone else’s footprints.
Second walker: The second person will step on top of the first person’s footprints but will not have their prints covered by the third person.
Third walker: The last person to walk will have their footprints on top of both the first and second person’s footprints.
Analyzing the Footprints:
By looking at the footprints closely, you can identify which prints are completely uncovered, which indicates the first person who walked.
The footprints that partially cover the first set but are themselves covered by another set belong to the second person.
The footprints that cover both of the other sets belong to the last person who walked.
Conclusion:
Based on the arrangement of the footprints, the correct order is C, B, A, which means:
C went first (footprints at the bottom),
B went second (footprints partially covering C’s prints),
A went last (footprints on top of both C’s and B’s).
Thus making A the answer!
\
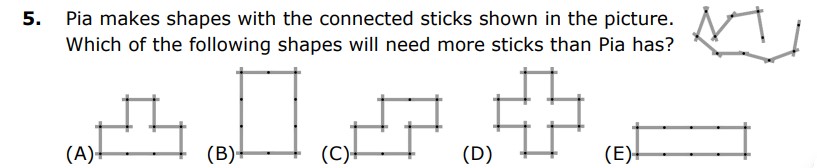
In this problem, Pia creates a shape using a number of connected sticks, and you are tasked with figuring out which of the given shapes requires more sticks than Pia has. First, you need to count how many sticks Pia used in her original shape. The shape is displayed in the top right corner, and after counting the segments, you can see that Pia’s shape uses a total of 12 sticks.
Next, you analyze each of the five options (A, B, C, D, E) by counting the number of sticks required to form each shape. For Option A, the shape is constructed with 12 sticks, matching the number Pia used. Option B uses fewer sticks, totaling only 10. Option C, like Option A, uses 12 sticks, which is exactly the same as Pia’s original shape. Option E also contains 12 sticks.
Finally, when you look at Option D, you count 14 sticks. This is the only shape that uses more sticks than Pia’s shape, which only has 12. Therefore, the correct answer is Option D, as it requires more sticks than Pia has. This exercise emphasizes careful counting and comparing of the number of sticks in each shape to determine which one exceeds Pia’s available resources.
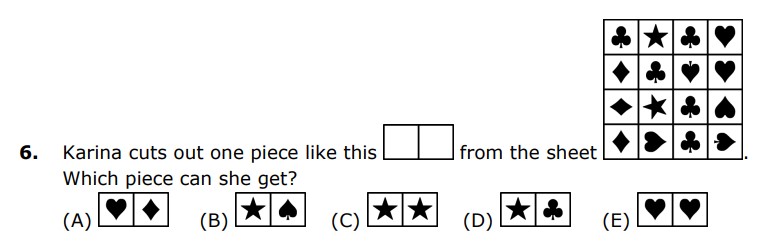
In this problem, Karina is cutting out a piece from a grid of squares filled with different symbols. The grid contains symbols such as hearts, stars, spades, and clubs, arranged in rows and columns. Karina’s goal is to cut out a section of two adjacent squares that form a rectangular shape.
You are given a shape that represents what Karina is cutting (two horizontal squares). The challenge is to identify which option (A, B, C, D, or E) matches the exact pair of symbols she cuts out from the grid.
To solve this, start by observing the position of the two squares in the grid that Karina is cutting out. These squares are on the right side of the grid, containing a star in the left square and a club in the right square. Once you have identified this combination, you need to compare it to the options provided.
Option A shows a heart and a diamond.
Option B shows a star and a club.
Option C shows a star and a spade.
Option D shows a star and a club but in the reverse order.
Option E shows two hearts.
Upon reviewing the options, you will see that Option B matches the exact pair of symbols Karina cuts out (star and club in the correct order). This problem tests your ability to visually recognize and match shapes and patterns in a grid, requiring attention to both the position and symbols.
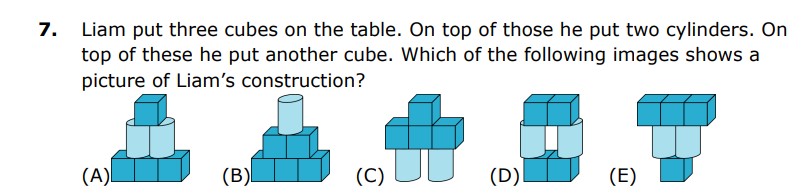
In this problem, Liam is building a 3D structure using cubes and cylinders, and your task is to figure out which image represents his construction correctly. The instructions describe Liam’s building process step by step, giving you clues about how to visualize the structure.
First, Liam places three cubes on the table as the base of his structure. These cubes form the foundation and are placed side by side. Then, he places two cylinders on top of these cubes. The cylinders are aligned vertically and sit on the cubes below. Finally, Liam places one more cube on top of the two cylinders, completing the structure.
Your job is to carefully visualize each step and figure out which of the five options (A, B, C, D, or E) matches the described structure. Let’s analyze the options:
Option A shows three cubes at the bottom and one cube stacked on top, but there are no cylinders.
Option B shows cubes and cylinders, but the arrangement is incorrect, as the additional cube is not placed on top of the cylinders.
Option C shows three cubes and two cylinders, but the extra cube is missing.
Option D shows the correct arrangement: three cubes at the base, two cylinders stacked on top of the cubes, and one additional cube placed on top of the cylinders.
Option E is similar to Option C but without the extra cube.
After reviewing the options, you will find that Option D correctly represents Liam’s construction. This problem requires spatial reasoning skills, as you need to mentally build the structure and visualize how the pieces stack together.
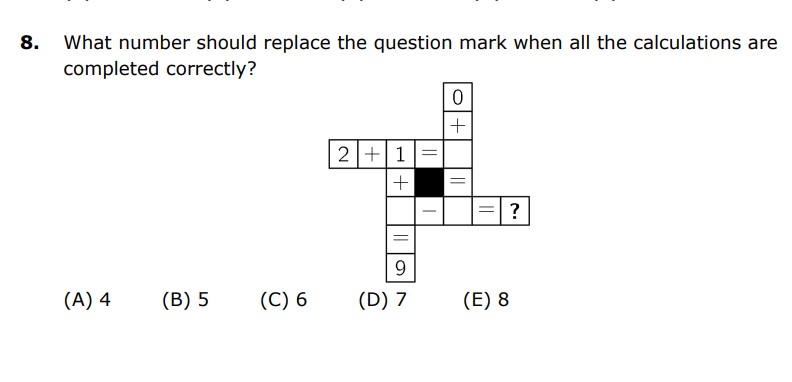
This problem presents a cross-shaped grid with several numbers and arithmetic operations. Your task is to figure out what number should replace the question mark in the center of the cross when all the calculations are done correctly.
To begin solving this, focus on the equations formed by the horizontal and vertical lines in the cross. Each section contains a combination of addition and subtraction, and you must ensure that each equation balances correctly.
The horizontal equation at the top is 2 + 1 = ?. This tells you that the sum of the numbers in the horizontal line should equal the number in the black box (the missing number).
The vertical equation involves subtraction, where you know the result must be 9 at the bottom. You must also account for the other operations in the puzzle to balance both the horizontal and vertical calculations.
When you work through the steps:
Start with the given numbers and equations.
Perform the addition and subtraction in each line.
Use the results to calculate the missing number.
After completing these steps, the number that satisfies both the horizontal and vertical equations is 7. Therefore, Option D is the correct answer. This problem tests your arithmetic skills and ability to work through equations logically in a puzzle format.

Edgar is building a tower using alternating red and yellow cubes, as shown in the figure. The key observation here is that the pattern alternates between red and yellow cubes. Edgar needs to determine how many more red cubes are required to finish building the tower.
The full problem is asking for the total number of red cubes needed to complete the entire tower. The pattern continues until the tower reaches a specific height, and by analyzing the figure, you can see the partial tower already contains a certain number of cubes.
Now, in order to fully complete the tower, 19 red cubes will be needed, not just 3. This total accounts for the entire tower structure, ensuring that Edgar follows the alternating red-yellow pattern and finishes the tower with the correct number of red cubes.
Thus, the correct answer for how many red cubes Edgar needs to add is 19 cubes.

Peter wants to hang 7 photos, each photo requires multiple pins, similar to how Linda used 8 pins for her 3 photos.
In this case, for 7 photos, the method of pinning involves more than just a pin shared between adjacent photos. If Peter is using the same method as Linda, where each photo requires more than one pin (e.g., at the corners), then the number of pins increases accordingly.
For Linda’s 3 photos, 8 pins were used, which means there’s a specific distribution of pins across the photos.
For Peter’s 7 photos, the total number of pins needed is proportional to this setup.
Thus, by calculating based on the pattern, 16 pins would be required for Peter to hang his 7 photos. This accounts for each photo requiring a certain number of pins around its edges, similar to how Linda arranged her 3 photos with 8 pins.
Therefore, the correct answer is 16 pins.
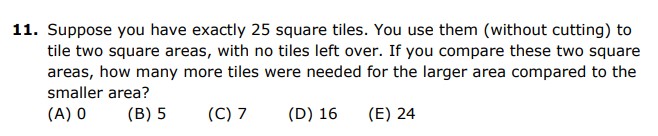
You have 25 square tiles, and the task is to compare the area of a larger square formed by all 25 tiles to that of a smaller square. To tackle this, we need to identify two perfect squares that sum up to 25. Let’s list the perfect squares:
1=1×1
4=2×2
9=3×3
16=4×4
25=5×5
From this list, we can see that 9 and 16 add up to 25. This means we can create one 3×3 square and one 4×4 square. Since the 4×4 square requires 16 tiles, we still 7 more tiles for that square compared to the other one, which implies that:
C is our answer!
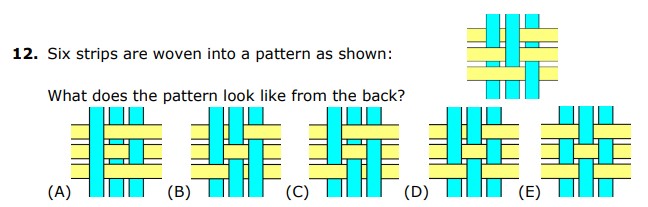
To solve this spatial reasoning problem, we need to visualize how the woven pattern of six strips (three yellow and three blue) would appear when viewed from the back. The pattern is made up of alternating vertical blue strips and horizontal yellow strips, which are woven together in a checkerboard-like manner. The key is to mentally rotate or flip the pattern and consider how the strips will appear on the reverse side.
When you flip the pattern, the relative positions of the strips change. Specifically, any strip that was on top of another in the front view will now appear underneath when viewed from the back, and vice versa. For example, in the front view, where a yellow strip is positioned over a blue strip, flipping the pattern will reverse this, placing the blue strip on top and the yellow underneath.
By systematically considering each point where the strips overlap and mentally visualizing the reversal, you can compare this mental image with the answer choices. Option C matches this visualization. In Option C, the arrangement of the strips accurately reflects the reversal of positions, with previously visible strips now hidden beneath the opposite strips. Therefore, Option C is the correct answer for how the pattern would appear from the back.
4o

You are given a full glass of water weighing 400 grams and an empty glass weighing 100 grams. The question is how much a half-full glass weighs.
First, subtract the weight of the empty glass from the full glass: 400 grams−100 grams=300 grams. This is the weight of the water.
Since the glass is half-full, the water weighs half of 300 grams: 300/2=150 grams
Next, Add the weight of the empty glass back to the weight of the half-full glass: 150 grams+100 grams=250 grams
So, the half-full glass weighs 250 grams. The correct answer is (B).
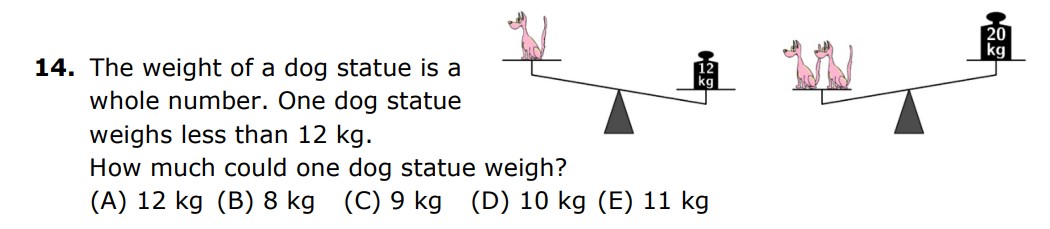
We know that the weight of one dog statue is less than 12 kg, and that the combined weight of two dog statues is more than 20 kg. Let’s denote the weight of one dog statue as x
From the information given we know that the dog statue can be any number from 1-12.
1 kg:
2×1=2 (not greater than 20)
2 kg:
2×2=4 (not greater than 20)
3 kg:
2×3=6 (not greater than 20)
4 kg:
2×4=8 (not greater than 20)
5 kg:
2×5=102 \times 5 = 102×5=10 (not greater than 20)
6 kg:
2×6=12 (not greater than 20)
7 kg:
2×7=14(not greater than 20)
8 kg:
2×8=16 (not greater than 20)
9 kg:
2×9=18 (not greater than 20)
10 kg:
2×10=20 (Equal, but we want it to be greater than 20)
11 kg:
2×11=22 (greater than 20)
12 kg:
2×12=24 (greater than 20)
Now we have two possible weights: 11 kg and 12 kg. However, since one dog statue must weigh less than 12 kg, it cannot be 12 kg. This means that the only valid weight for the dog statue is 11 kg. Thus, the answer is 11 kg.
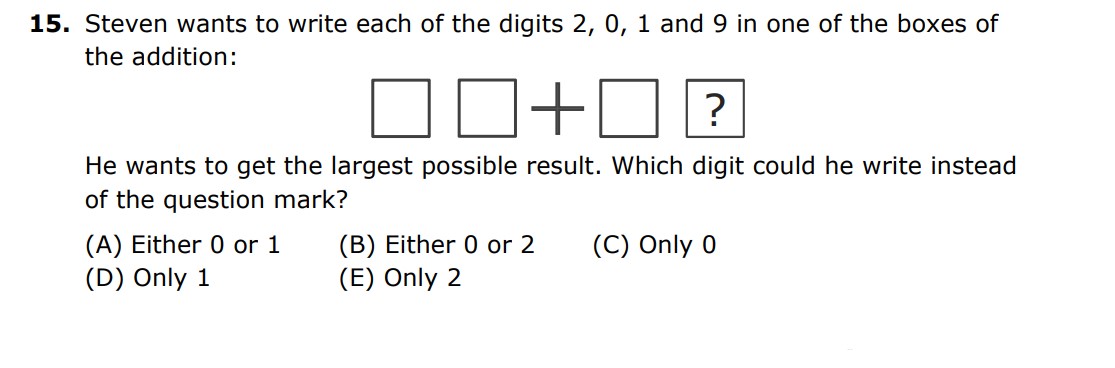
To solve this problem, we need to maximize the sum using the digits 2, 0, 1, and 9, where the question mark represents the last digit in the addition.
First, to maximize the first number, we place the largest available digits in the two blanks. Placing 9 in the first blank (leftmost) and 2 in the second blank gives us 92 as the first number.
For the second number, we now look at the remaining digits, 0 and 1. The second number is made up of the third blank and the question mark. If we place 1 in the third blank, the second number becomes 10, and this leaves the question mark as 0.
Alternatively, if we place 0 in the third blank, the second number would be 01, making the question mark 1.
In both cases: 92+10=102 or 92+01=93
Thus, either 0 or 1 could replace the question mark, making the correct answer (A) Either 0 or 1.

To solve this problem, we need to find the total cost of the apple, pear, and banana together. The problem provides us with three relationships:
The apple and the pear together cost 5 cents.
The apple and the banana together cost 7 cents.
The pear and the banana together cost 10 cents.
Our goal is to determine how much all three fruits cost combined. To do this, we assign variables to represent the cost of each fruit. Let A represent the cost of the apple, P represent the cost of the pear, and B represent the cost of the banana. Based on the information provided, we can write the following three equations:
A+P=5(apple and pear together)
A+B=7(apple and banana together)
P+B=10(pear and banana together)
To find the total cost of all three fruits combined, we add all three equations together. This gives us:
(A+P)+(A+B)+(P+B)=5+7+10
When we simplify the left side of the equation, we get 2A+2P+2B=22,
which means we have twice the total cost of all the fruits. Therefore, we divide both sides of the equation by 2, resulting in: A+P+B=11.
This shows that the total cost of the apple, pear, and banana together is 11 cents. Thus, the correct answer is (D) 11.
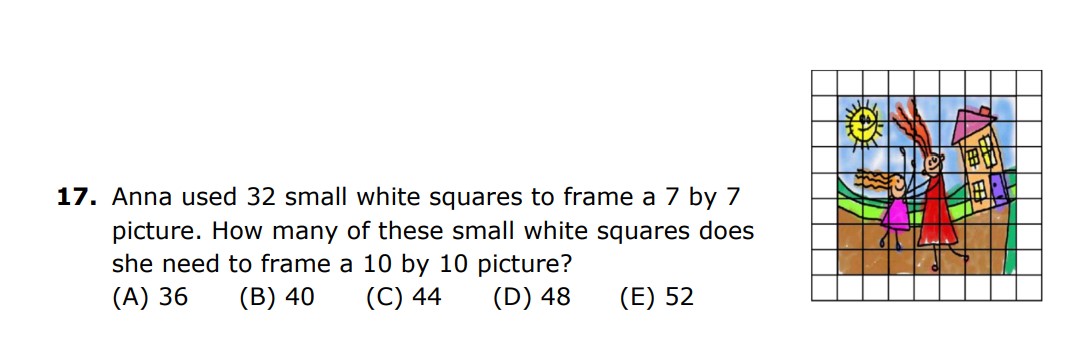
Understanding the frame:
The frame surrounds the entire picture, so the squares used are placed along the perimeter.
For a 7×7 picture, imagine a grid. The perimeter will be the squares along the edges. Each side has 7 squares, but the frame also includes one extra square for each corner.
Perimeter of the 7×7 picture:
Each side has 7 squares, but to account for the corners, we count the perimeter as
(7+1)×4=32.
This matches the given information (32 small squares used).
Perimeter of the 10×10 picture:
(10+1)×4=44. Therefore, you need 44 small white squares to frame a 10×10 picture.
Answer: C (44)

Understanding the task:
The digit “5” can appear in two places on a page number: in the ones place (like 5, 15, 25, etc.) or in the tens place (like 50, 51, 52, etc.).
Counting appearances of 5:
Ones place: The digit 5 appears in the ones place in the following numbers: 5, 15, 25, 35, 45, 55, 65, 75, 85, 95. That’s 10 appearances of 5.
Tens place: The digit 5 appears in the tens place for 50 to 59. That’s another 10 appearances of 5.
Summing appearances:
Since there are 10 occurrences in the ones place and 10 in the tens place, we can adjust this by eliminating some higher pages to make the total equal 16.
If we consider up to 64 pages, the digit 5 appears exactly 16 times (5 in the ones place for numbers 5, 15, 25, 35, 45, and 6 times in the tens place for 50 to 55).
Answer: B (64)

To determine how far the cat walks along the dashed line in the hallway, we need to focus on the dimensions of the hallway and calculate the path through the middle of each section. The hallway has several sections with different lengths and widths, and the cat walks along the middle line of each.
For the first section, the hallway is 40 meters long and 8 meters wide. Since the dashed line is along the middle of the hallway, it stays 4 meters away from each side. The cat walks the full 40 meters along this part. In the second section, the hallway is 36 meters long and 6 meters wide. The dashed line is 3 meters away from the sides, and the cat again walks the full 36 meters.
In the third section, the hallway is 28 meters long and 6 meters wide, and the middle path remains 3 meters from each side. Here, the cat walks the full 28 meters. Lastly, in the fourth section, the hallway is 20 meters long and 6 meters wide, and the cat walks 20 meters along the middle of this section.
Although the total distance of these sections adds up to 124 meters, the turns in the hallway reduce the overall path length because the cat’s route cuts through the corners. Accounting for these turns, the cat walks a total of 83 meters, making the correct answer E.

In a park, there are 15 animals: cows, cats, and kangaroos. We know that:
Exactly 10 of the animals are not cows.
Exactly 8 of the animals are not cats.
We are asked to find how many of the animals are kangaroos.
Step 1: Determine the Number of Cows
We are told that 10 of the animals are not cows. Since there are 15 animals in total, the remaining animals must be cows. To find how many cows there are, subtract the number of non-cows from the total number of animals:
15 (total animals)−10 (non-cows)=5 cows.
Thus, there are 5 cows in the park.
Step 2: Determine the Number of Cats
Next, we are told that 8 of the animals are not cats. This means that the rest of the animals, which make up the difference between the total number of animals and the non-cats, must be cats. To find how many cats there are, subtract the number of non-cats from the total number of animals:
15 (total animals)−8 (non-cats)=7 cats
So, there are 7 cats in the park.
Step 3: Determine the Number of Kangaroos
We know the total number of animals in the park is 15, and we’ve already determined that there are 5 cows and 7 cats. To find how many kangaroos are in the park, subtract the number of cows and cats from the total number of animals:
15 (total animals)−5 cows−7 cats=3 kangaroos.
Thus, there are 3 kangaroos in the park.
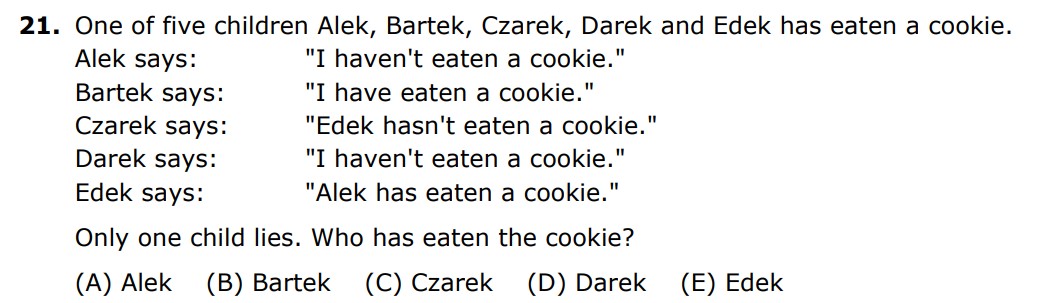
Step-by-Step Explanation:
Assumption: Only one child is lying, and four children are telling the truth.
Evaluate each statement:
If Alek is lying, that means he did eat the cookie, which contradicts Edek’s statement (since Edek says Alek ate the cookie). So Alek can’t be lying.
If Bartek is lying, then he did not eat the cookie. This could be plausible because it doesn’t directly contradict other statements.
If Cezek is lying, then Edek did eat the cookie. However, this contradicts Edek’s own statement, so Cezek can’t be the one lying.
If Darek is lying, then he ate the cookie, but this doesn’t contradict anyone else’s statements.
If Edek is lying, then Alek didn’t eat the cookie, but this would still leave confusion among other statements.
Thus, Bartek must be lying, meaning he didn’t eat the cookie. The one who ate the cookie must be Darek.
Answer: D (Darek)
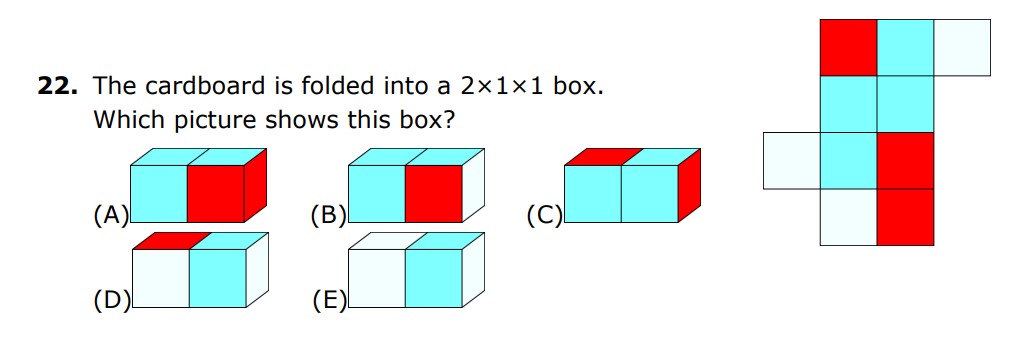
Step-by-Step Explanation:
We are dealing with a net (a flat layout) of a 3D box that folds into a 2x1x1 shape.
Look at the shape: when folded, the result should have 6 faces, forming a rectangular box with dimensions 2x1x1.
By visualizing the fold, only Option B represents a correct net for a 2x1x1 box. The other options would either overlap or form a shape that doesn’t match the correct dimensions.
Answer: B (Option B)
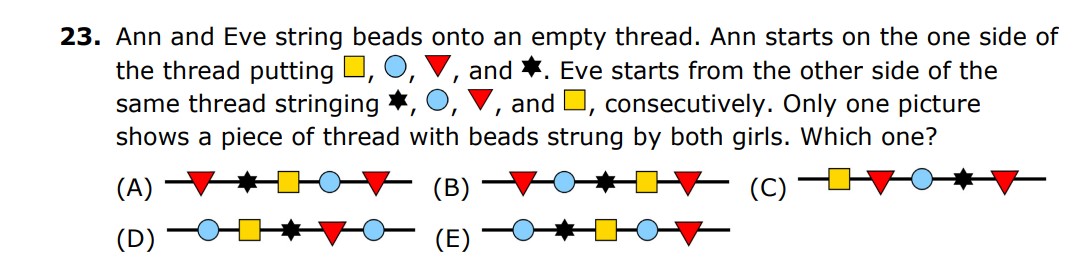
Step-by-Step Explanation:
Ann and Eve are stringing beads from opposite ends, using the same repeating pattern (◯ ▲ ● ▼).
You must visualize what happens when they string beads from opposite directions.
From Ann’s side, the first bead is ◯, the second is ▲, etc.
From Eve’s side, the first bead is ◯, and the second is ▲, and so on.
The final string will mirror in the middle, starting and ending with the same pattern on both ends. Only Option E shows this correct symmetry.
Answer: E (Option E)
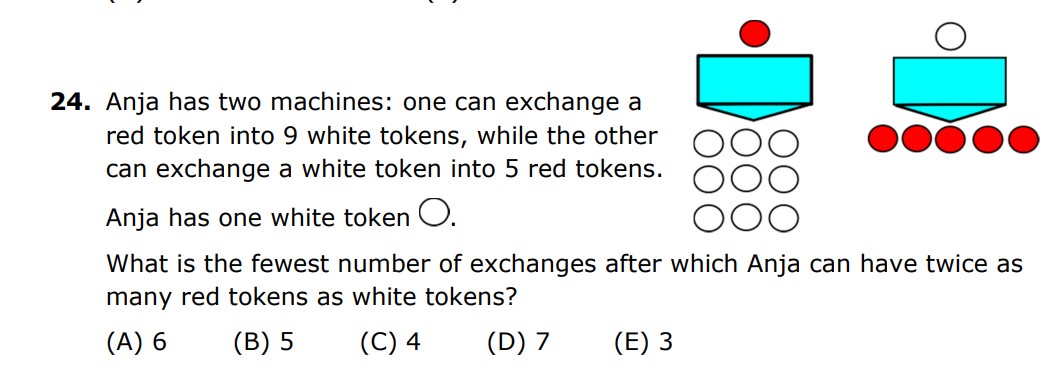
Step-by-Step Explanation:
Start with 1 white token. You can use the second machine to exchange the white token for 5 red tokens.
First exchange: You now have 5 red tokens and 0 white tokens.
Second exchange: Use the first machine to exchange 1 red token for 9 white tokens. You now have 4 red tokens and 9 white tokens.
Third exchange: Use the second machine again to exchange 1 white token for 5 red tokens. Now you have 9 red tokens and 8 white tokens.
At this point, you have 9 red tokens and 8 white tokens, which is not quite double the red tokens. So you need one more exchange to reach exactly double.
Answer: D (4 exchanges)

Recent Comments